Urban Mediascape


"The cantilevering roof plate is a dominant component of the architectural expression; during the day and especially in the evening, when the transparent façade allows the building to glow from the inside."

Schmidt Hammer Lassen Architects
Urban Mediaspace

Europaplads, Århus, Denmark

Relationship between Architecture and Technology. Mies Van de Rohe


“...Architecture depends upon its time.
It is the crystallization of its inner structure,
the slow unfolding of its form.
That is the reason why technology and architecture are so closely related.
Our real hope is that they will grow together,
that some day the one will be the expression of the other.
Only then will we have an architecture worthy of its name:

architecture as a true symbol of our time


Mies van der Rohe
(March 27, 1886 – August 17, 1969)

3ds Max Tutorial to Use Lighting and Reflections HDRI

Here’s a 3ds Max tutorial that have purpose to use HDRI - lighting and reflections. For this tutorial I am using 3dstudio MAX 6 and Brazil 1.2 to render. Do not dispair though if you do not have Brazil, its only a renderer, the tutorial goes through how to make it with 3dsmax alone. Brazil just speeds up the rendering process for my benefit. Unfortunately if you are using 3dsmax3 you will need to upgrade, if you are using 4 or 5 you will need to download this

http://www.splutterfish.com/sf/downloads/max/hdri/HDRI_v1.0.1.zip

And if you are using max6, then thank your lucky stars, its already installed for you (isn’t that nice of good old discreet?)

HDRI light probes can be downloaded from
http://www.debevec.org/Probes/

HDRshop can be downloaded from
http://www.debevec.org/HDRShop/
HDRshop is a must have for any 3d enthusiast and also essential for working with HDR images. Although not in this tutorial.. I don’t have time to explain hdr shop nor setting up probe images from mirrored ball to latitude/longitude.

1. OK, firstly, if we are going to make lighting and reflections, we need something to light up and reflect the environment. As you can see from the image below, i have really pushed the boat out and created, not just one sphere, not two or three, but four, and to further advance my cg talents, I’ve also created a plane for my four amazingly complex spheres to sit on. And doesn’t it look spectacular right now? Really the objects aren’t important, since no one really uses HDRI to light 4 spheres anyway, just use the tutorial to light any scene you like.

2. Now that we have our brilliantly creative starting point. Lets create some HDRI reflections.

Firstly, download this - http://www.bfgc.pwp.blueyonder.co.uk/hdri/Apt-probe.hdr

Secondly lets add the reflection map: goto rendering> environment, under background, click the “environment map:” box (its the one that currently says none in it), choose bitmap and then choose the apt-probe that you just downloaded, after you click ok it brings up another window, press ok on this one too. Now, with the environment window still open, open the material editor aswell. Drag and drop the “map #1 (apt-probe.hdr) into a free slot in the materials editor setting it as an instance, and follow the next instructions: -In the “coordinates” rollout, change the mapping type to “spherical environment” (its in the drop down box next to mapping if you get stuck looking), and change the blur to 0.1. now scroll down to the “output” rollout and set the RGB level to 100 (or any number, it really depends how you want you reflections to look).


3. Great our shiny objects are now reflecting nicely :) Lets make some nice lighting. Create a skylight and place it somewhere in the middle of your scene above your objects.

Download http://www.bfgc.pwp.blueyonder.co.uk/hdri/apt-BLRD.hdr and then place it in the “none” box underneath “sky colour” in the modify proerties of the skylight. Do exactly the same as you did for the apt-probe by instancing it into the mats editor and using the same settings as the reflection map. Note: you will have to ensure the “environ” button is checked in the “coordinates” rollout before you can change the mapping to spherical environment render, and there you have it.. HDRI.

3ds Max Tutorial to Make Crystal Ball

Here’s a 3ds Max tutorial to make a crystal ball. This tutorials will show you an easy way to make a crystal ball. Enjoy it!

First reset max. Then choose the sphere Object, then take your cursor and make a nice sized sphere.


Now press “m” to bring up the material editor, and select a normal gray unmodified material and check the three boxed circled below:


Now we have to make a nice reflection. To do this go to “maps” in your material editor, and open it up. Then check reflection, and click were it says “none” to chose he image that you want it to reflect. To get the right effect you are going to need something that is a shiny chrome color. If your version of max came with the materials that mine did than chose the chrome material below:


Now we need to give the ball a “see through” affect. To do this go to maps, and check “opacity” and were it says “none” click and chose “falloff”.


Now scroll back up to were the material colors are now you are all done, when it is rendered you should get an image very close to the one below:


Enjoy it!


V-Ray Grass

If you are using v-ray and don't use the VRayDisplacmentMod, then you should switch to mental ray! I use both, but v-ray is very powerful at performing geometric displacement, and is superb at creating organic objects; even grass looks good with displacement. Mental ray is good at displacing small polygons of geometry, where V-ray is good at displacing detail over large polygons. For this reason v-ray 1.50 sp1 is much more successful at creating grass for very large sites; a big plus!


A torus-knot with VRayDisplacmentMod modifier (light cache & irradiance map with 2 vray area lights)


The shader is simply just a VRayMat, with a grass map in the diffuse slot. Then I applied the VRayDisplacementMod modifier to the object. I instanced the image map from the shader into the displacement modifier.


VRayDisplacementMod settings:

• For something like grass it’s very important to use 2D mapping rather 3D mapping.

• I instanced the image map from the shader into the Texmap.

• I changed the amount to 4” to have taller grass blades.

• I increased the resolution to 2048 for better quality.


Tour on Garden and Sea house

Garden and Sea / Takao Shiotsuka Atelier
By Nico Saieh

Architects: Takao Shiotsuka Atelier
Location: Japan
Client: Private
Project year: 2008
Constructed area: 237 sqm
Photographs: Toshiyuki YANO (Nacasa & Partners Inc.,)

The site faces the sea and has deep depth. And it inclines toward the sea by the vertical interval like 2M. We arranged the house in the center of the site. The plane shape of the house is wedge to spread towards the sea.

We planned the first floor as a place to enjoy a garden. The part facing the garden of the half underground is a glass window. By it, a slope of the ground just appears as form of the openings. The exterior floor covered with the white gravel. Since it is surrounded by the outside wall, outside can also be felt like the interior of a room. By place to stay and movement at that time, relations with a person and the ground surface change.

The second floor enabled it to set up a sense of distance with the sea variously in the inside of a building. The both ends of cylindrical space long in the direction of marine are glass windows. An indoor partition wall is also glass. We can look at sea side and the location of the other side at the same time from the room. Even if the sojourner is in any place, he can see or feel the sea.

The first floor that enjoys the yard, the second floor that enjoys the sea, and 2 space were divided clearly. Owner enabled it to spend the time of non-every day by going back and forth mutual space with the different feature appropriate for the cottage.

Best Green House

Good Things, Small Package: A two-bedroom house and the subdivision it hails from defy Texas conventions

Shipley Architects


…Cheatham divided the site into 50 building lots, divvying the number between progressive spec homes and empty land that purchasers can reinvent with the help of an approved architect…


…Shipley Architects has been chosen by land buyers four times, and it has wrapped up two projects. Most notable of this pair is the 1,500-square-foot residence known as UR 45, which the local firm designed for Urban Edge executive Rick Fontenot…


…"Rick observed me working and responding to some of the problems with the other houses," Dan Shipley, FAIA, says of his selection to work on UR 45. "I think he saw a flexibility to experiment and to adjust to smaller budgets." Indeed, UR 45 currently contains just two bedrooms…


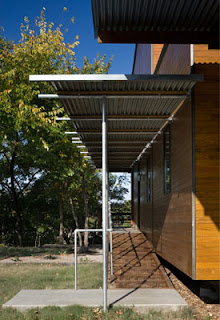
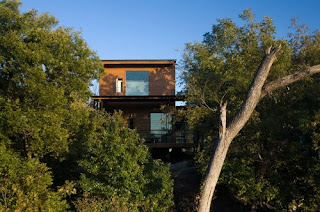
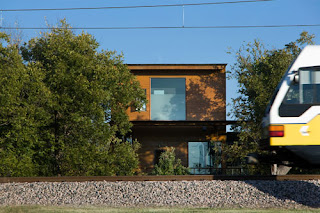
…The little terraced building sits on six concrete piers, with its back to the street: An opaque carport marks the east-facing street side of the house, and Fontenot and his wife enter the house via a ramp that leads to a door on the long, southern elevation; it opens directly into a living room with kitchen island…


…“There’s nothing particularly exciting about the form except that I think it’s well-proportioned and has a certain logic to it,” Shipley says, adding, “Because it’s very compact, floats above the piers, and that you enter it from this gangplank, it’s like a houseboat.” Both the carport and house volume are wrapped in southern yellow pine boards normally used in porch flooring…


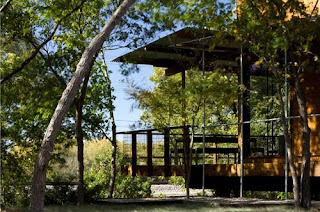
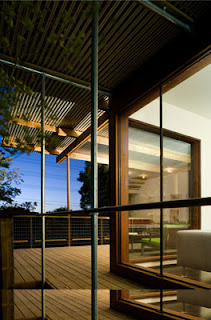
…Between the great room and its westward view of local DART trains sits a porch that cantilevers over a ridge leading down to the light rail’s tracks. This deep outdoor room protects occupants from direct sunlight, while trees soften the glare of summer’s late-afternoon rays…


…Shipley, who cites foam insulation and geothermal air-conditioning among UR 45’s sustainable features, says that even though fenestration “is probably less than 25 percent of the building envelope, we tried to locate all the glass so you always feel close to natural light.”…


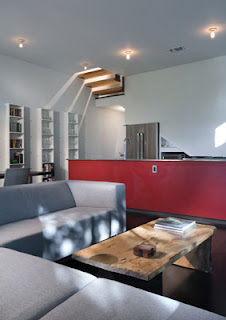
…In a poetic example of that effort, light filters into the great room through open risers in the stairway that separates the great room from a guest bedroom…


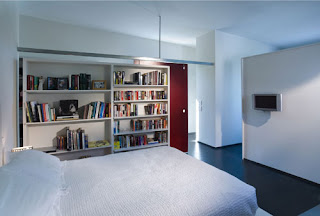
… The stairway leads to the second-story master bedroom suite…


…Stair treads
comprise glulam salvaged from other Urban Reserve projects, while the flooring is recycled from the dance floor of Fontenot’s own wedding…


...Architect and client are aiming to certify UR 45 as LEED Platinum. The designation would stand as an example for the neighborhood because—while Shipley compares Urban Reserve to “a parking lot full of nicely designed cars like Coopers and Fiats”—the subdivision is conscientious, too...


…The DART station is nearby, and the team that includes Cheatham and Fontenot have removed few trees from the site, implemented rainwater harvesting, and minimized street widths and the stormwater runoff that correlates with it.

X House / Arquitectura X


Architects: Arquitectura X - Adrian Moreno Núñez, Maria Samaniego Ponce
Location: La Tola, valle de Tumbaco, Quito, Ecuador
Contractor: Adrian Moreno Núñez, Carlos Guerra Espinosa
Client: Adrian Moreno Núñez, Maria Samaniego Ponce, Lía Moreno Samaniego
Design year: 2003 – 2006
Construction year: 2006 – 2007
Structural Engineer: Pedro Caicedo
Electrical Engineer: Pedro Freile
Services: Raúl Cueva
Constructed area: 380 sqm
Photographs: Sebastián Crespo


Design Concepts

1
Not having a site when we started design on our house, we set out an elemental scheme that could work both in Quito and the valleys east of the city; this meant distilling our experience into an abstracted form, inspired in the work of Donald Judd, that could be placed in any of the sites we would be likely to find: an open ended box, whose spatial limits would be the eastern and western ranges of the Andes.


2
As we had no actual place, we looked to the spaces we felt our own, and found the patio as the essential place maker throughout our architectural history.

3
On the other hand was our fascination for the prototypical glass house and its possibilities in our year round temperate climate.

4
While the patio creates a sense of place it has to be enclosed in order to work, so the mountains can’t become the spatial limit. The glass house is perfect for that unlimited sense of space; the addition of a patio to the glass house gave us the chance to adapt to the different site possibilities.

5
We separated the private and public spaces defining a patio, the service spaces and circulation could be added as a plug-in as needed depending on site conditions, further defining the patio.


6
Finally this diagram could be fitted into the open ended box according to specific site conditions that would define orientation, size and proportion.